In development, when your Windows Azure web role is running in the local development fabric, you can normally only access it on http://127.0.0.1 on the local machine.
A couple of days ago I published an article with instructions to bypass this localhost restriction:
Accessing the Windows Azure local development fabric from another computer
http://blog.ehuna.org/2009/10/accessing_the_windows_azure_lo.html
The solution above uses SSH tunnels and involves two computers, a server and client and an authentication model.
I found a new way to bypass this localhost restriction, which is a bit simpler. See the details below.
An easier way to access the Windows Azure
local development fabric from another computer
Here's the setup overview -
1 – Download rinetd, the internet ``redirection server''.
2 – Configure rinetd.
3 – Run rinetd (manually).
4 – Download ServiceEx, a windows application that allows a normal program to run as a Windows service.
5 – Configure ServiceEx to make rinetd a windows service.
6 – Run rinetd as a windows service
Thanks to my co-worker William for the ServiceEx tip!
You execute the above steps on the same computer where your Windows Azure local development fabric is running - let's call it MYSERVER1.
Note that I call this computer "MYSERVER1" but it does not have to be an actual Windows Server. In my case "MYSERVER1" is a Windows Vista Ultimate 32-bits running as a Virtual PC 2007 virtual machine.
1 - Download rinetd
rinetd is an old Unix utility – but there is a free Windows port here:
http://www.boutell.com/rinetd/
Download rinetd here: http://www.boutell.com/rinetd/http/rinetd.zip
Once you download rinetd.zip, you will find a "rinetd" directory inside the ZIP file -
The ZIP file contains the source code if you'd like to recompile it.
For now, we'll simply extract the file rinetd.exe - and copy it to c:\winutil\rinetd
(note: this could be any directory, in my example I will be using the directory c:\winutil\rinetd)
That's it - you've just installed rinetd.
2 - Configured rinetd
Now let's open a command line window and run rinetd -
By default, rinetd looks for its configuration file in the default Unix location - "/etc/rinetd.conf".
Since we are running It on Windows, we'll create our own configuration file in c:\winutil\rinetd\rinetd.conf
In our example, we have a Windows Azure project with one web role running an ASP.NET web site. We’ve defined the following InputEndpoint in our ServiceDefinition.csdef -
<WebRole name="MYPROJECTONMYSERVER1_WebRole" enableNativeCodeExecution="true">
<InputEndpoints>
<InputEndpoint name="HttpIn" protocol="http" port="8080" />
</InputEndpoints>
...
</WebRole>
After we run my Azure project in Visual Studio (or use CSRun.exe), we see it was properly deployed in the local development fabric -
We now open a browser and point it to http://127.0.0.1:8080/
(Visual Studio may have opened it for you if you checked "Start web browser") -
We have verified that our web role is working fine.
The Windows Azure local development fabric only accepts requests on localhost, the IP address 127.0.0.1. To access it from another computer, we need to know MYSERVER1's IP address.
In a cmd shell, type "ipconfig" -
In my example, the IP address for MYSERVER1 is 10.0.10.133.
Let’s create a new file named rinetd.conf in the c:\winutil\rinetd\ directory -
Entries in the rinetd.conf configuration file are forwarding rules. The format of a forwarding rule is as follows:
bindaddress bindport connectaddress connectport
We now open rinetd.conf with Notepad and add the following -
10.0.10.133 8080 127.0.0.1 8080
This rule tells rinetd that if a request is made on port 8080 in the 10.0.10.133 IP address, it should be forwarded to port 8080 on the 127.0.0.1 IP address.
You can also add multiple rules in the rinetd.conf configuration file - here are three sample ports -
That's it - we're done configuring rinetd.
Save the rinetd.conf file and close Notepad.
3 – Run rinetd (manually)
Now, let's run rinetd, but this time we use the "-c" parameter passing in the rinetd.conf file location -
That's it! Now go to another computer and point your browser to http://10.0.10.133:8080 -
You've just accessed your Windows Azure web role from a machine that is not running the local development fabric - sweet!
We can also create a batch file, let's call it rinetd-run.bat to start rinetd with a click:
c:
cd c:\WinUtil\rinetd
start c:\WinUtil\rinetd\rinetd.exe -c c:\WinUtil\rinetd\rinetd.conf
We save this batch file in C:\WinUtil\rinetd\rinetd-run.bat so we can easily start rinetd anytime.
4 – Download ServiceEx.
As seen above it's pretty easy to configure and run rinetd. But there's one disadvantage in running it manually: every time we log off or reboot our computer, we need to run rinetd again.
In the next steps, we'll use ServiceEx, an application that allows us to run rinetd as a windows service.
Point your browser to:
- Download http://serviceex.com/files/ServiceEx.exe and save it in the c:\winutil\rinetd\ directory
- Download http://serviceex.com/files/ServiceEx.ini.sample and save it in the c:\winutil\rinetd\ directory
- Rename c:\winutil\rinetd\ServiceEx.ini.sample to c:\winutil\rinetd\RinetdService.ini
You should now have the following files in the c:\WinUtil\rinetd\ directory -
5 – Configure ServiceEx to make rinetd a windows service.
Here's the default ServiceEx.ini.sample file (which we renamed to RinetdService.ini):
; Instructions for installing a service:
;
; 1. Edit this file. You need to fill in the values for ServiceExeFullPath, options,
; desktop, Start and StartNow below.
; 2. Decide on a name for the service.
; 3. Save this file as that name, with an .ini extension added. For example, if you will name
; the service "NotepadService", you would save this file with the name NotepadService.ini
; in the same directory where ServiceEx.exe is located.
; 4. In Windows, select Start/Run then enter "cmd", without the quotes, in the prompt.
; 5. Chdir to the directory where you have placed ServiceEx.exe
; 6. Type "ServiceEx install <servicename>". If all goes well your service will be installed (and running,
; if you so specified).
;
;
; Once you have run ServiceEx successfully, if you want to change the values in this file, you should do the following:
;
; 1. Stop the service (i.e. run "net stop <serviceName> at the command line)
; 2. Remove the service (i.e. run "ServiceEx remove <serviceName>)
; 3. Edit and save this file as desired. This file must be named the same as the service name with an .ini extension added.
; 4. Install the newly configured service (i.e. run "ServiceEx install <serviceName>).
;
; Unless you change the executable file, it is better to use the service manager to modify these values.
; Please visit serviceex.com for information on how to do that.
;
; full path to exe to be run as a service--use quotes if path contains spaces
; The section identifier below is REQUIRED
[ServiceEx]
ServiceExeFullPath = "C:\Program Files\My Program.exe"
; program arguments to be sent to executable
options =
; can program interact with desktop [true | false] (default: true)
desktop = true
; start type (valid values: Auto Manual Disabled) (default: auto)
Start=Auto
; start the service upon installation [true | false] (default: no)
StartNow=false
Let’s open RinetdService.ini in Notepad (or your favorite text editor), and make the following changes:
ServiceExeFullPath = "c:\WinUtil\rinetd\rinetd.exe"
options = -c c:\WinUtil\rinetd\rinetd.conf
So we end up with this:
Let’s save our changes and close Notepad. We now open a cmd window and go to the c:\WinUtil\rinetd\ directory, then run:
ServiceEx install RinetdService
(Note that you do not add ".ini" to "RinetdService)
If you go to control panel > services, you should now see "RinetdService" installed -
6 – Run rinetd as a Windows Service
You can start and stop it using the Services panel, or you can do it from the command line using -
To start: "net start RinetdService"
To stop: "net stop RinetdService"
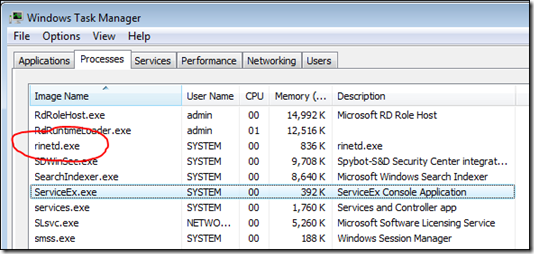
In Task Manager you can verify that rinetd.exe is indeed running:
Now log off or reboot - once you run your Azure web role again, try accessing it from another computer -
It just works - like magic! ;-)
If we run CurrPorts (http://www.nirsoft.net/utils/cports.html), we see that rinetd is listening on ports 8080, 8081 and 8082:
One last note: if you want to make changes to rinetd.conf, you must follow these instructions -
; Once you have run ServiceEx successfully, if you want to change the values in this file, you should do the following:
;
; 1. Stop the service (i.e. run "net stop <serviceName> at the command line)
; 2. Remove the service (i.e. run "ServiceEx remove <serviceName>)
; 3. Edit and save this file as desired. This file must be named the same as the service name with an .ini extension added.
; 4. Install the newly configured service (i.e. run "ServiceEx install <serviceName>).
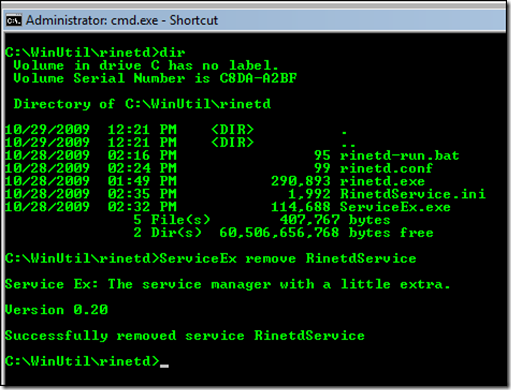
Here's a sample screenshot of running ServiceEx to remove the RinetdService windows service:
Good times!


![clip_image010[1] clip_image010[1]](http://blog.ehuna.org/liveimages/AneasierwaytoaccesstheWindowsAzurelocald_C1FD/clip_image0101_thumb.png)
![clip_image001[1] clip_image001[1]](http://blog.ehuna.org/liveimages/AneasierwaytoaccesstheWindowsAzurelocald_C1FD/clip_image0011_thumb.png)


Comments