A couple of months ago when I started working with Windows Azure, I quickly realized that a web role running on the local development fabric could only bind to localhost (127.0.0.1). I opened a thread in the Microsoft forums:
Can the development fabric bind to the real IP address? (not 127.0.0.1)
http://social.msdn.microsoft.com/Forums/en-US/windowsazure/thread/9b8957e6-7983-47a7-9d75-954dee70dbf0
One developer, JuanSueroNYC, found a way to make this work for WCF services. But I want to access ASP.NET Sites as well as WCF Services running on my Azure web roles – and I’d like to make it as simple as possible (one time configuration).
Whenever I’m working on a project I like to use CruiseControl.NET (http://ccnet.thoughtworks.com/) and create a continuous integration system. Every night at 2:00 AM , this system is responsible for getting the latest code from source control, compiling, running unit tests, deploying and more. This allows our business folks to get an earlier look at our product and makes sure no single developer or designer has broken the build.
We also work on WPF smart clients and I didn’t want to force the client teams to run the Azure web roles on their machines just because Microsoft only allows the local development fabric to bind to 127.0.0.1.
I was bummed out when I realized that Microsoft has placed this dumb restriction on Windows Azure web roles. I’ve seen a response from Microsoft where they mumble something about the local development fabric running with admin rights and that not being secure – but I could always run IIS with admin rights – should we only allow IIS to bind to 127.0.0.1?
My guess is that this dumb decision was made by some pointy head guy who doesn’t understand technology and was afraid that from a business perspective developers would use the local development fabric as a cheap Production load balancer. Ridiculous – but don’t underestimate the stupidity of business folks.
Ok, enough ranting – see below for a full tutorial on how to access web roles running on a Windows Azure local development fabric from any other computer and not only on http://127.0.0.1 on the local host. Thanks to my co-worker Lanh for coming up with this solution – great work!
Accessing the Windows Azure local development fabric from another computer
In development, when your Windows Azure web role is running in the local development fabric, you can normally only access it on http://127.0.0.1 on the local machine.
The document below describes how to access this web role from any other computer using SSH tunnels.
Setup Overview
1 – Install freeSSHd, the SSH server, from http://www.freesshd.com
2 – Add users to freeSSHd.
3 – Allow tunneling in freeSSHd.
4 – Start the freeSSHd service.
5 – Download and install PuTTY, the SSH client.
6 – Configure PuTTY
7 - Run PuTTY
Let's define two computers:
MYSERVER1 - the computer where you're doing your Azure development, where you're running Visual Studio or CSRun.exe. Basically the computer where the local development fabric is running. This is where we'll run freeSSHd, the SSH server.
MYSERVER2 - the computer that will run PuTTY, the SSH client.
Note that I call these computers "MYSERVER1" and "MYSERVER2" but these do not have to be actual Windows Servers.
In my case "MYSERVER1" was Windows Vista Ultimate 32-bits running as a Virtual PC 2007 virtual machine, while "MYSERVER2" was a Windows Server 2008 R2 server (not a VM).
On MYSERVER1
1. Download and install freeSSHd
Download freeSSHd from from http://www.freesshd.com
Install freeSSHd -
Accept the default options and click "Next" a bunch of times.
When you're asked if private keys should be created, click "Yes".
Also click "Yes" when asked if you want to run freeSSHd as a system service:
Click Finish.
2. Add user to freeSSHd
Click on the Windows Start menu and start freeSSHd -
In Vista/Windows Server 2008, note that I run it as an Administrator - otherwise I found the settings I was defining were not being picked up by the freeSSHDService windows service later.
The freeSSHd icon should appear in the tray area, right click and choose "Settings…"
The freeSSHd settings window appears, click on the Users tab -
Then click on "Add…" -
We create a user called "webroleclient" with the options above.
Make sure you remember the password, we'll need it later.
Click 'OK' and the "webroleclient" login is created -
3. Allow Tunneling in freeSSHd
Now click on the "Tunneling tab -
Allow both local and remote port forwarding and click 'OK'.
4. Start the freeSSHd service
You can start the SSH server through the settings UI, but it's better to start the windows service.
This way if you reboot, the server will run.
If you've started the SSH server through the settings UI, you'll see a green status under the "Server status" tab:
Click on "Click here to stop it" and make sure the SSH server is not running -
Now right-click on Computer > Manage > Services and Applications > Services
Double click on the "FreeSSHDService" entry -
Set the "Startup type" to "Automatic" and click "Apply".
Then click "Start" -
Click 'OK' and you should see the FreeSSHDService started and its startup type set to "Automatic" -
5. Download and install PuTTY
The steps below should now be executed on MYSERVER2
The steps below are now executed on MYSERVER2. This will typically be the machine from where you are trying to access the Azure web role running on the local development fabric on MYSERVER1, but it could be any other machine. We couldn't get both the SSH client and server working on the same machine, so we had to use another computer.
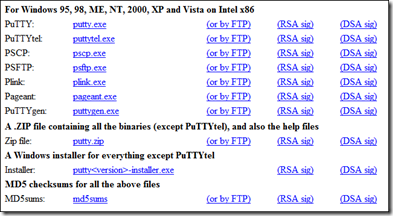
Point your browser to http://www.chiark.greenend.org.uk/~sgtatham/putty/download.html and download PuTTY for your OS -
You can download the installer or just the putty.exe itself.
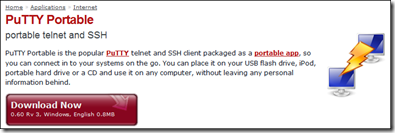
If you use PortableApps.com, there's also a portable Putty:
http://portableapps.com/apps/internet/putty_portable
See my screencast on Cloud computing today, not tomorrow - using Live Mesh (https://www.mesh.com/) with PortableApps.com rocks.
6. Configure PuTTY
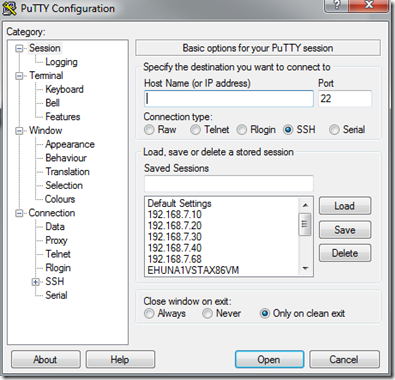
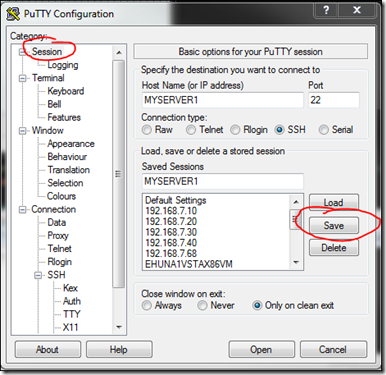
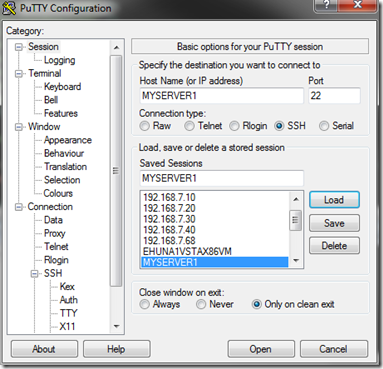
Run PuTTY which shows the "Session" screen -
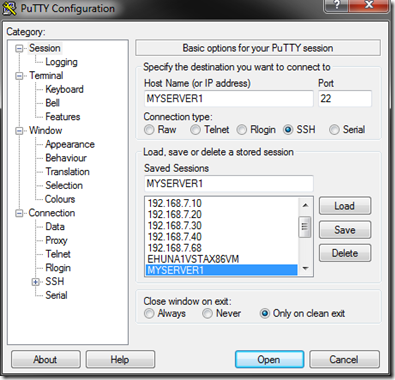
Set 'Host Name' to 'MYSERVER1' (or use its IP address)
Set 'Saved Sessions" to 'MYSERVER1'
Click 'Save' -
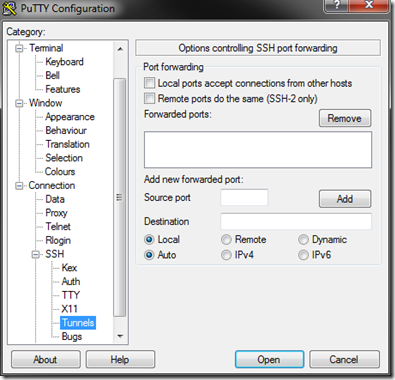
Click on Connection > SSH > Tunnels
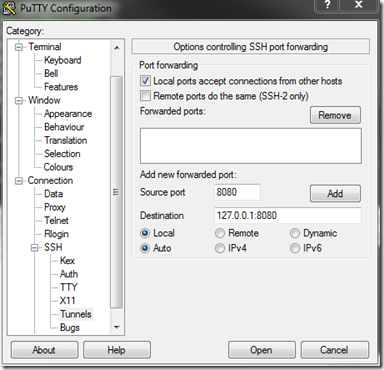
Check 'Local ports accept connections from other hosts'
Set the source port to '8080' (or whatever you have defined as one of your Windows Azure web role InputEndpoints -
<WebRole name="MYPROJECTONMYSERVER1_WebRole" enableNativeCodeExecution="true">
<InputEndpoints>
<InputEndpoint name="HttpIn" protocol="http" port="8080" />
</InputEndpoints>
...
</WebRole>
Set the destination to '127.0.0.1:8080'
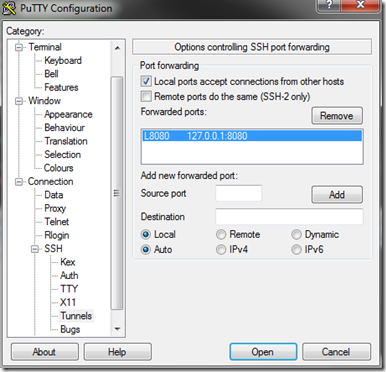
Click 'Add'
Go back to the Session category and click 'Save' -
7. Run PuTTY
Run PuTTY and click on Session
Click on 'MYSERVER1' > Load
Click 'Open' -
Login as 'webroleclient' and use the password we defined in step 2, Add user to freeSSHd.
You should now be logged in and you can use the cmd shell on MYSERVER1.
That's it - you're done you can now access your Windows Azure web role running in the local development fabric from any computer by simply pointing using the SSH tunnel you've created on MYSERVER2!
7. Examples: Web Roles running an ASP.NET site and a WCF Service
ASP.NET Web Site
For example. let's say on MYSERVER1 you have a Windows Azure project with one web role running an ASP.NET web site.
You've defined the following InputEndpoint in your ServiceDefinition.csdef -
<WebRole name="MYPROJECTONMYSERVER1_WebRole" enableNativeCodeExecution="true">
<InputEndpoints>
<InputEndpoint name="HttpIn" protocol="http" port="8080" />
</InputEndpoints>
...
</WebRole>
You run your project in Visual Studio (or use CSRun.exe) and you see it was properly deployed in the local development fabric -
On MYSERVER1, you open a browser and point it to http://127.0.0.1:8080/
(Visual Studio may have opened it for you if you checked "Start web browser")
You verify that your web role is working fine.
Now on MYSERVER2, you open a browser and point it to http://MYSERVER2:8080/
You can now access your web role running on MYSERVER1 from MYSERVER2 or any other computer that can connect to MYSERVER2!
WCF Service
Now let's say you have a WCF Service hosted on a Windows Azure's web role. You've defined the following InputEndpoint in your ServiceDefinition.csdef -
<?xml version="1.0" encoding="utf-8"?>
<ServiceDefinition name="ServiceAzureHost" xmlns="http://schemas.microsoft.com/ServiceHosting/2008/10/ServiceDefinition">
<WebRole name="ServiceAzure_WebRole" enableNativeCodeExecution="true">
<InputEndpoints>
<InputEndpoint name="HttpIn" protocol="http" port="8000" />
</InputEndpoints>
<ConfigurationSettings />
</WebRole>
</ServiceDefinition>
You run your project in Visual Studio (or use CSRun.exe) and you see it was properly deployed in the local development fabric -
On MYSERVER1, you open a browser and point it to your service - in my example: http://127.0.0.1:8000/PointCentralService.svc
(Visual Studio may have opened it for you if you checked "Start web browser")
On MYSERVER2, we add one more tunnel to PuTTY's configuration for the MYSERVER1 session:
We click 'Add' and see the new tunnel needed for our WCF Service:
Remember to go back to the 'Session' screen and save/update your MYSERVER1 session.
Now open the MYSERVER1 session in PuTTY and login -
Once logged in you'll see the cmd shell prompt -
Tip: PuTTY works from the command line - add it to a batch file -
PuTTY.exe -load "<SESSIONNAME>" -l <USERNAME> -pw <PASSWORD>
Example in batch file:
start PuTTY -load "MYSERVER1" -l webroleclient -pw mypw162
Now open a browser on MYSERVER2 or any other computer and point it to http://MYSERVER2:8000/PointCentralService.svc -
We can see our WCF Service definition, access its WSDL, or run clients from any other computer - accessing the web role running on MYSERVER1.
Good times!




![clip_image001[4] clip_image001[4]](http://blog.ehuna.org/liveimages/AccessingtheWindowsAzurelocaldevelopment_9A32/clip_image0014_thumb.png)
![clip_image002[4] clip_image002[4]](http://blog.ehuna.org/liveimages/AccessingtheWindowsAzurelocaldevelopment_9A32/clip_image0024_thumb.png)
![clip_image003[4] clip_image003[4]](http://blog.ehuna.org/liveimages/AccessingtheWindowsAzurelocaldevelopment_9A32/clip_image0034_thumb.png)
![clip_image004[4] clip_image004[4]](http://blog.ehuna.org/liveimages/AccessingtheWindowsAzurelocaldevelopment_9A32/clip_image0044_thumb.png)
![clip_image005[4] clip_image005[4]](http://blog.ehuna.org/liveimages/AccessingtheWindowsAzurelocaldevelopment_9A32/clip_image0054_thumb.png)
![clip_image006[4] clip_image006[4]](http://blog.ehuna.org/liveimages/AccessingtheWindowsAzurelocaldevelopment_9A32/clip_image0064_thumb.png)
![clip_image007[4] clip_image007[4]](http://blog.ehuna.org/liveimages/AccessingtheWindowsAzurelocaldevelopment_9A32/clip_image0074_thumb.png)
![clip_image008[4] clip_image008[4]](http://blog.ehuna.org/liveimages/AccessingtheWindowsAzurelocaldevelopment_9A32/clip_image0084_thumb.png)
![clip_image009[4] clip_image009[4]](http://blog.ehuna.org/liveimages/AccessingtheWindowsAzurelocaldevelopment_9A32/clip_image0094_thumb.png)
![clip_image010[4] clip_image010[4]](http://blog.ehuna.org/liveimages/AccessingtheWindowsAzurelocaldevelopment_9A32/clip_image0104_thumb.png)


Comments