A few months ago we installed an Endless Pool in our house – for more information on the Endless Pool, click here.

Our iPad hangs out by the clean Endless Pool
The Endless Pool is a complete system that includes the pool plus a water quality system located at the front of the pool to heat, filter and purify the water, a swim current generator and return channels. Unlike a traditional pool, an Endless Pool requires very little maintenance, on average a few minutes each week to test the water and add some Clorox bleach.
The Endless Pool contains a filter that needs to be either replaced or cleaned every few months. I found a great article on Endless Pool maintenance here – but it did not contain any pictures. As I cleaned my filter, I took a bunch of pictures and I thought it would be a good idea to post it here (plus if I ever forget how to clean my filter, I can always look up this tutorial).
See below for more pictures and details – the pictures and instructions below are provided for reference only – the lawyers tell me that I am not responsible if you blow up your Endless Pool or damage it in any way for misreading anything in my blog.
How to clean your Endless Pool filter
Cleaning the filter – there’s a model of the Endless Pool called the “Smart Pool”. I don’t have a “Smart Pool”, if you have a "Smart Pool" start reading after number 15 below.

Find where your pool equipment is stored. In my case, we built a pool equipment area, right behind the room that hosts our Endless Pool (we built a whole room to host the pool – see this slideshow for more info). Just as I just did above, each picture below is followed by an explanation.

Before you start make sure your turn off your Endless Pool filtering system – and make sure it won’t start while you’re cleaning the filter.

1. You should know what the pressure gauge reads when a new filter is put in the cartridge. It is usually about 10 psi. That is read on the gauge on the top of the filter cartridge. Either make note of that pressure, or on the newer pools there is a dial on the pressure gauge with 2 arrows. The lower of the 2 arrows should be placed on the pressure indicated when a new filter is inserted in the cartridge. When the pressure rises to the second arrow (or 10 psi above the starting pressure), and this may take 6 months or more with indoor pools, it is time to clean the filter.
General Info: the filter must be removed from the filter cartridge. This requires some upward tugging of the lid as explained in #6 below. It also requires that the water is lowered in the filter cartridge so that when the lid is removed water does not spill all over the place. Follow the steps below to remove the filter and clean it.
 |  |
 |  |
Find your valves and close them – there should be two as described below, although in my case the second valve went from the heater to the filter. This valve was hidden under the pipes – see the pictures above.
2. There should be a valve between the skimmer and the pump. Close it. There should be a valve between the heater and the pipe returning to the pool. Close it. The pool should now be isolated from the water quality components. Be sure there is no possibility of the water quality pump turning on when these valves are closed. Pipes can be broken and floods may occur!!!!!
General Info: there is a brown plastic water valve in the pipe from the filter that goes to the heater. When that faucet is opened (hold a container under it to catch water) there should be very little water flow. That proves the pool is isolated.
 |  |
 |  |
3. With a hose or container held under the opened faucet (that will prevent 1 gallon of water from going on the floor), open the air entry valve on the top of the filter cartridge. It is to the right of the gauge. It opens by twisting it counter-clockwise ¼ of a turn. Air will now enter the top of the filter cartridge and water will freely flow out the faucet. After about a gallon is removed, the filter cartridge top is ready to be removed.
 |  |
4. About 1/3 of the way down from the top of the filter cartridge is a brown ring. The ring has 4 protrusions sticking out 90 degrees from each other. Two of the 4 are larger than the other 2. The larger ones have a lever on the underside that should be pressed upward. When both are up twist the ring counter-clockwise and it will loosen. After ¼ of a turn the ring can be lifted off the top of the filter cartridge. (The lid of the filter will not have moved.)
 |  |
5. Now grab the handles of the filter cartridge lid and forcefully pull the lid upward. It will release from the top of the cartridge exposing the filter and remaining water.
 |  |
6. The filter is pushed down over a black plastic filter holder. The filter holder has a round top and a bottom that covers the entire bottom of the filter. If you want to remove the filter from the black holder push down on the round black top while holding the filter. The filter comes off the black plastic by pulling it upward and away from the flat part of the black plastic holder.
 |  |
7. If the filter is really disgusting it should be discarded. Otherwise, the filter should be cleaned with a garden hose with a jet nozzle. Start at a known point. Aim the hose at the top of the filter. Move the hose back and forth about 3" and then down to the bottom of the filter. Rotate the filter and continue to clean from top to bottom until you have returned to the starting point.
8. Put everything back together - follow the pictures above backwards to put the filter back and start the system again -
- Look at the filter. It has the word, "BOTTOM" on the side that goes down on to the black holder. If it says "TOP" that goes up. It should be firmly seated.
- The filter and holder should now be put back into the filter cartridge. Put it down into the middle of the cartridge. Rotate it slightly from left to right and it will drop into place. Put the top to the filter cartridge on. Press it down and then put the brown ring on. It should rotate about ¼ of a turn clockwise before it clicks into the locked position. Make sure you hear that click!
- Close the air entry valve on the top of the filter cartridge by rotating it clockwise and push down.
- Open the 2 valves previously closed that come from and go back to the pool.
- Turn on the water quality pump and check the pressure on the top of the filter cartridge. It should have dropped from the maximum pressure that caused you to clean the filter. It will not go back to the new filter pressure because there will be some "permanent" clogging of the filter.
General Info: after cleaning the filter many times it may become stained and/or clogged. You may not be able to clean it. You may not be able to get the pressure back more than 3 or 4 psi from the pressure you used to determine that the filter needed cleaning. In either case it is time to install a new filter and discard the old one.
Smart Pool owners: You have 2 smaller filters inside the Skimmer. Turn off the water quality and snap the door to the skimmer off. It is held by two plastic connectors at the bottom. Snap off one side and then slide the other out sideways. Reach into the skimmer and remove the two filters. The lower one has a plastic tab making it easier to grip it. Pull them out the front of the skimmer. Now go to number 9 above and clean both. Then put them back in the skimmer and reattach the door. That should be easy but because the filters are smaller they will have to be cleaned more frequently.
I copy below the full text from the Maintaining your Endless Pool page – just in case it disappears in the future. It contains a lot more information than just how to clean your filter – very good stuff. If you have some time, check out www.deep-six.com – who wrote the original article and buy some of their stuff.
Maintaining your Endless Pool
http://www.deep-six.com/page101.htm
MAINTAINING ACCEPTABLE QUALITY WATER
IN YOUR ENDLESS POOL
Points to consider about your new Endless Pool:
When you turn the current off or on in the pool be sure the current speed is turned to low (counter-clockwise) before pushing the on-off button. Turning the current on with the speed set to high may cause the propeller blades to break!
The water level in the pool should not get too low. Keep the level about ½" below the top of the propulsion housing at the front of the pool. If it gets too low the skimmer will start taking in air and that creates noise, poor filtration, and in some cases an air-bound pump which is really bad. If the water is allowed to get too high in the pool the relief valve in the top of the skimmer will start to leak water and it will drip to the floor on the outside front which may not be visible.
The water in a pool MUST be kept in good swimming condition. Chemically it MUST test safe for bathing. Endless Pools supplies a test kit that allows you to make sure the water in your pool is of good quality. The following information will allow you determine what the water quality is and what to do to keep it where it should be. The test kit has a plastic comparator and chemicals with various colored tops. These are used to test the chemical quality of the pool water. Look closely at the comparator. There is a large test tube on one side. There is a small tube on the other side. The large tube has a 25 ml mark in the middle of the side of it. The small tube has a 9 ml mark about 1 cm. down from the top on the side. Those are the only levels we will be dealing with. Between the two test tubes there are colors that are used to make sure your pool water is chemically satisfactory.
1. You must make sure the water is sanitary. Germs introduced by swimmers must not be allowed to survive in a pool. Organic matter introduced by swimmers must be decomposed and eliminated. Algae should not be allowed to thrive. Killing evil agents is a key to good water for swimming. Every pool requires a sanitizing agent. Whether it is chlorine, bromine, Bacquacil, ozone, Clorox, etc., the introduction of a killing agent and maintaining its level is extremely important for the water to look clear and clean.
The test kit has 3 yellow-topped tubes. You will use only the first 2, R-0001 and R-0002, to make sure the chlorine or bromine is at the level that is proper. Rinse the small tube with the pool water. Now fill the small tube to the 9mm mark. Add 5 drops of the R-0001. (Officially, droppers are designed to yield the proper size drop when the dropper is held directly upside down - not sideways.) Add 5 drops of the R-0002. Mix the tube's contents and look at the color that is produced. If it matches the middle pink on the comparator scale your water has the proper level of sanitizing agent. If the color is low, or there is no color, you must immediately add sanitizing agent. If you do not do it the water may become milky and is not sanitary. If the color is too pink you must cut back on the amount of chlorine or bromine you add to your pool.
If you use the yellow canisters of Nature2 in your pool please read the section below that follows the 2 pictures of Nature2.
2. The pool water should not be too acid or base. If the water becomes too acid the metal in the pool (the "stainless" steel benches) may start to rust. The copper heater coil in the pool heater will disintegrate. If the water gets too basic the water may become unsanitary because the chlorine or bromine may not be affective. No matter what, it is important to keep the water satisfactory for swimming and good for your pool and skin!
To make sure the pH (acid/base) is proper you need to put the pool water about ½ of the way up the small comparator tube. Add 1 or 2 drops of the red R-0004. Mix and observe the color. Yellow is very bad. The water is too acid. Red indicates the pH is too high. Orange is ideal. If you have a yellow color because the pH is too low, add 1 cup of the pH Rise supplied by Endless Pools. If the color is red add ½ cup of the pH Down. Add the chemicals at the front of the pool with the current running. Slowly pour either into the current, rinse the cup into the current, and let the current run for a minute or 2. Retest the pH to see if you have made the result orange. If not, add more of the corrective chemical.
3. Alkalinity is a pool water factor that some people treat as not being important. That is crap! Alkalinity keeps the pool water at a consistent pH. Without the proper amount (about 120 ppm) the pH may go crazy from one swim to the next! Low alkalinity values cause the pool water to become corrosive. Even stainless steel will rust! Alkalinity is increased by adding common and ordinary baking soda to the pool water. Baking soda is known to the chemistry guys as Sodium Bicarbonate. The container supplied by Endless Pools may be called "Alkalinity Rise" or "Alkalinity Increaser". The chemical formula is NaHCO3. The Na is sodium, the H is hydrogen (or "bi" in the chemical world). And the CO3 is carbonate. You need baking soda in your pool! You are wasting a heap of money if you buy the product from a pool store. Get it in quantity when yours runs low at a Sam's, BJ's, or Costco outlet.
Fill the large comparator to the 25 ml. mark. Using the green-topped test chemicals, add 2 drops of R-0007, 5 drops of R-0008 and then mix the test tube contents. Now we are going to titrate. That means we are going to add another chemical drop-by-drop, and counting each drop, until a color change becomes permanent. You will notice the color of the solution in the comparator is green. We are going to titrate until it turns (and stays) red after mixing. Add a drop of R-0009. Mix and look at the color. No change? Add another drop. Do that until the color becomes red. Twelve drops is what you want. If it takes less, than you need to add baking soda (alkalinity). Each drop equals 10 ppm. You need 120 ppm. As an example, if it took 6 drops to change the water from green to red you would have 60 ppm of alkalinity in your pool. You need no less than 120 so add 1 cup of baking soda (Alkalinity Increaser) to the water in the current. Test again after the current has run for a minute or 2 and see what you have achieved.
The fourth (and last) chemical needed in indoor pool water is the calcium level. Simply, this is a measure of the water's hardness. Hard water is good for pools (and is good for you to drink, unlike soften water which replaces the healthy calcium and magnesium with sodium chloride). Low calcium levels in pool water increases the corrosion potential. Your pool should have at least 180 ppm hardness.
Fill the large comparator to the 25 ml. mark. Using the blue-topped test chemicals, add 20 drops of R-0010, 5 drops of R-0011 and then mix the test tube contents. Now we are going to titrate. That means we are going to add another chemical drop-by-drop, and counting each drop, until a color change becomes permanent. You will notice the color of the solution in the comparator is red. (If it is blue at this point you are testing softened water that has no calcium. Skip the titration process.) We are going to titrate until it turns (and stays) blue after mixing. Add a drop of R-0012. Mix and look at the color. No change? Add another drop. Do that until the color becomes blue. Eighteen drops is what you want. If it takes less, than you need to add Calcium Increaser. Each drop equals 10 ppm. You need at least 180 ppm. As an example, if it took 12 drops to change the water from red to blue you would have 120 ppm of hardness in your pool. You need no less than 180 so add 1 cup of calcium carbonate (Calcium Increaser) to the water in the current. Test again and see what you have achieved.
The pH and bromine or chlorine should be tested frequently, possibly every day in the beginning of your pool start-up. You will be able to adjust the testing frequency after a few weeks and you come to know how your pool water behaves. The alkalinity should be tested weekly after you have achieved the desired level. The calcium changes very little over time but should be tested on a monthly basis.
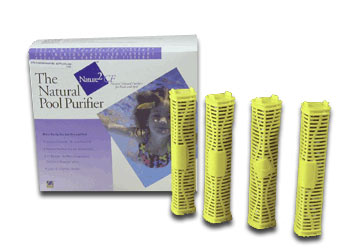
The above pictures are of the Zodiac Nature2 Mineral Pool Sanitizers. They usually come 4 to a box with a plastic top and bottom holding them together. In large pools, such as those found at schools, colleges, etc. 4 of the cartridges are placed in the water filtration system (such as the inside of the filter). In Endless Pools 1 or 2 are placed in the water quality such as inside the filter or in the skimmer basket. In large pools 4 cartridges last about 4 months. In Endless Pools 1 lasts 3 months, 2 last 6 months, and 4 last for about 1 year.
If you are using the Nature2 cartridge(s) you must use chlorine. They will not work with bromine because silver bromine makes the pool water cloudy. The ingredients inside each cartridge consist of small pellets containing silver and copper. As the pool water passes through these cartridges it picks up silver and copper ions and puts them in the pool water. Silver kills bacteria (that is why silver/mercury fillings in your teeth were so effective!) and copper kills algae. The combination of the two goes a long way in keeping your pool water sanitary. However, the beads are not 100% effective. Therefore, it is important to add chlorine (Clorox) to your pool water to keep the level at the lightest pink (0.5 ppm) on the test scale. In the long run you will be saving money and creating less chlorine odor using the Nature2 cartridges but they must be changed according to the above schedule. The Nature2 sanitizers contain 3.51% metallic silver (from silver nitrate) and 8.23% copper sulfate pentahydrate as the active ingredients.
There is another chemical that is used where there is excessive sunlight such as an outdoor pool. Sunlight causes a major chlorine loss. To reduce the affect, Cyanuric Acid is added to outdoor pools until the level reaches 40 - 100 ppm. (That may be tested for using the white vials in the Taylor Kit.) Excessive amounts will cause the chlorine to become less effective in santizing the pool water. the only way to reduce excessive Cyanuric Acid levels in pool water is to change the water.
As time passes and chemicals (from swimming, evaporation with water additions, and pool chemical additions) are added to the pool water it will become more salty. The amount of salt in water is referred to as the "Total Dissolved Solids". Test kits do not usually have chemicals to determine the TDS, but pool stores might. The maximum level of TDS in a pool is 1500 ppm. Too much salt may cause deposits on the pool walls, in the pool plumbing, and in the heater and filter. Tap water might be 100-300 ppm. The threshold for fresh vs. salt water is 1000 ppm although one cannot taste the salt at that low level. Pools that are sanitized by a salt system are about 3000 ppm. The ocean averages about 35,000 ppm TDS. A pool water change is necessary to lower the TDS.
The water quality system consists of several components that might vary slightly from one pool installation to another, but the differences do not change the required outcome. The water comes from the front of the pool via 1½" white PVC pipe and enters the front of the pump. It will have passed through the skimmer basket which will collect floating objects in the pool. A few particles will get through the skimmer basket and may get caught in the basket at the front of the pool pump. (Check both baskets periodically to clean them.)
The water is then forced out of the top of the pump to the bottom back of the filter cartridge. Inside the cartridge the water is forced to pass through the filter. This is a cleanable and replaceable item that captures very small particles and removes them from the water. It will get dirty as time passes. How much dirt it removes from the pool water depends on many factors: Indoor pools stay cleaner. Pools in dusty conditions collect dirt more often. People using the pool with dirty feet, bodies, kids, etc. will have to clean the filter more frequently. A dirty filter may lead to cloudy water and poor filtration. Poor filtration may lead to the loss of chlorine or bromine because of low water flow. Poor filtration may cause a low pressure that will prevent the heater from turning on.
Cleaning the filter (If you have a "Smart Pool" start reading after number 15 below.):
1. You should know what the pressure gauge reads when a new filter is put in the cartridge. It is usually about 10 psi. That is read on the gauge on the top of the filter cartridge. Either make note of that pressure, or on the newer pools there is a dial on the pressure gauge with 2 arrows. The lower of the 2 arrows should be placed on the pressure indicated when a new filter is inserted in the cartridge. When the pressure rises to the second arrow (or 10 psi above the starting pressure), and this may take 6 months or more with indoor pools, it is time to clean the filter.
2. The filter must be removed from the filter cartridge. This requires some upward tugging of the lid as explained in #6 below. It also requires that the water is lowered in the filter cartridge so that when the lid is removed water does not spill all over the place.
3. There should be a valve between the skimmer and the pump. Close it. There should be a valve between the heater and the pipe returning to the pool. Close it. The pool should now be isolated from the water quality components. Be sure there is no possibility of the water quality pump turning on when these valves are closed. Pipes can be broken and floods may occur!!!!!
4. There is a brown plastic water valve in the pipe from the filter that goes to the heater. When that faucet is opened (hold a container under it to catch water) there should be very little water flow. That proves the pool is isolated.
5. With a hose or container held under the opened faucet (that will prevent 1 gallon of water from going on the floor), open the air entry valve on the top of the filter cartridge. It is to the right of the gauge. It opens by twisting it counter-clockwise ¼ of a turn. Air will now enter the top of the filter cartridge and water will freely flow out the faucet. After about a gallon is removed, the filter cartridge top is ready to be removed.
6. About 1/3 of the way down from the top of the filter cartridge is a brown ring. The ring has 4 protrusions sticking out 90 degrees from each other. Two of the 4 are larger than the other 2. The larger ones have a lever on the underside that should be pressed upward. When both are up twist the ring counter-clockwise and it will loosen. After ¼ of a turn the ring can be lifted off the top of the filter cartridge. (The lid of the filter will not have moved.)
7. Now grab the handles of the filter cartridge lid and forcefully pull the lid upward. It will release from the top of the cartridge exposing the filter and remaining water.
8. The filter is pushed down over a black plastic filter holder. The filter holder has a round top and a bottom that covers the entire bottom of the filter. If you want to remove the filter from the black holder push down on the round black top while holding the filter. The filter comes off the black plastic by pulling it upward and away from the flat part of the black plastic holder.
9. If the filter is really disgusting it should be discarded. Otherwise, the filter should be cleaned with a garden hose with a jet nozzle. Start at a known point. Aim the hose at the top of the filter. Move the hose back and forth about 3" and then down to the bottom of the filter. Rotate the filter and continue to clean from top to bottom until you have returned to the starting point.
10. Look at the filter. It has the word, "BOTTOM" on the side that goes down on to the black holder. If it says "TOP" that goes up. It should be firmly seated.
11. The filter and holder should now be put back into the filter cartridge. Put it down into the middle of the cartridge. Rotate it slightly from left to right and it will drop into place. Put the top to the filter cartridge on. Press it down and then put the brown ring on. It should rotate about ¼ of a turn clockwise before it clicks into the locked position. Make sure you hear that click!
12. Close the air entry valve on the top of the filter cartridge by rotating it clockwise and push down.
13. Open the 2 valves previously closed that come from and go back to the pool.
14. Turn on the water quality pump and check the pressure on the top of the filter cartridge. It should have dropped from the maximum pressure that caused you to clean the filter. It will not go back to the new filter pressure because there will be some "permanent" clogging of the filter.
15. After cleaning the filter many times it may become stained and/or clogged. You may not be able to clean it. You may not be able to get the pressure back more than 3 or 4 psi from the pressure you used to determine that the filter needed cleaning. In either case it is time to install a new filter and discard the old one.
Smart Pool owners: You have 2 smaller filters inside the Skimmer. Turn off the water quality and snap the door to the skimmer off. It is held by two plastic connectors at the bottom. Snap off one side and then slide the other out sideways. Reach into the skimmer and remove the two filters. The lower one has a plastic tab making it easier to grip it. Pull them out the front of the skimmer. Now go to number 9 above and clean both. Then put them back in the skimmer and reattach the door. That should be easy but because the filters are smaller they will have to be cleaned more frequently.
Vacuuming the Pool:
Your Endless Pool should have a vacuum system. It consists of a vacuum hose, a vacuum head, and a handle that extends from short to long. The water quality system is used to vacuum. The vacuum head is passed over the benches and then the pool bottom in order to pick up particles that have been introduced into the pool such as sand, insects, and lint. How often you need to vacuum will depend on how often debris is noticed on the bottom, as well as the owner's tolerance. Outdoor pools will need to be vacuumed more frequently. (Smart pool owners should use a portable vacuum system. See the information below. Deep-Six sells those at a discount price. Contact us at 888-901-5780.)
Pull the skimmer door open and take the skimmer basket out. Put the basket back in the skimmer opening sideways so the door is forced to remain in the opened position. Turn the water quality pump on.
Attach the vacuum hose to the vacuum head. Attached the vacuum handle to the vacuum head so that the 2 plastic buttons to snap in place in order to hold the 2 together. Put the vacuum head in the water and extend the handle to full length by turning the plastic piece in the middle that allows extension. Then turn the piece the other way to lock the extension in place.
It is important to get all the air out of the vacuum hose before attaching it to the water quality system. Put the free end of the vacuum hose into the stream of water that is entering the pool at the front on the left side of the propulsion housing. The water coming into the pool will be shot into the vacuum hose. The air will be forced out through the vacuum head as will be noticed by the bubbles coming from it at the bottom of the pool. Take the hose from the water stream, keep it under water, and more it over to the skimmer. Hold the skimmer door open and take the skimmer basket out which was holding the door open. Move the vacuum hose end, keeping it under water, into the bottom of the skimmer and into the hole at the bottom. The water will now move from the vacuum head into the skimmer pipe and the pool may now be cleaned.
With the vacuum handle move the vacuum head over the bench surfaces and the pool bottom. As the head is moved particles will be picked up from the bottom of the pool and will get caught in the filter. The pool will look clean when you have finished!
After cleaning the pool it is time to remove the hose and vacuum head. Hold the skimmer door open and reach into the skimmer. Pull the vacuum hose from the hole in the bottom of the skimmer. Put the skimmer basket back into the skimmer and release the door. Roll the hose up and hold it over the pool. Remove it from the vacuum head. Shake the water from the hose over the pool water. Put all away for the next vacuum episode.
For Smart Pool owners: The Catfish is a convenient way to vacuum the pool.
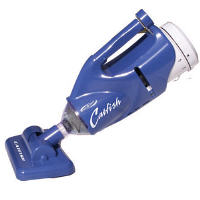
The Catfish is a totally independent and self contained battery powered, dual function small to medium sized pool, spa and hot tub vacuum cleaner. It operates on a long life, rechargeable nickel metal hydrate battery. All pool debris is collected in an easy to replace long life reusable on board filter bag. It attaches to any standard pool pole for extended reach to clean an entire pool or may be hand held for spot and quick cleanings.
• Battery powered
• Cleans medium sized pools, spas and hot tubs
• Rechargeable nickel metal hydrate battery
• Collects all pool debris
• Long life reusable on board filter bag
• Attaches to any standard pool pole for spot and quick cleanings
• Assembled Dimensions: 18"L x 8"W x 7.5"H
Warranty:
1 year
Contact us for the sale price: Click HERE to Send E-mail to Deep-Six or call toll-free 888-901-5780


Comments